Docusaurus to Quarto:A Powerful Scientific Blogging

Discover why I migrated from Docusaurus to Quarto for my blog, and how you can harness Quarto’s power for scientific content, beautiful websites, and seamless publishing.
Quarto
Static Site
Author

Rakesh Venkat

Published

November 8, 2025

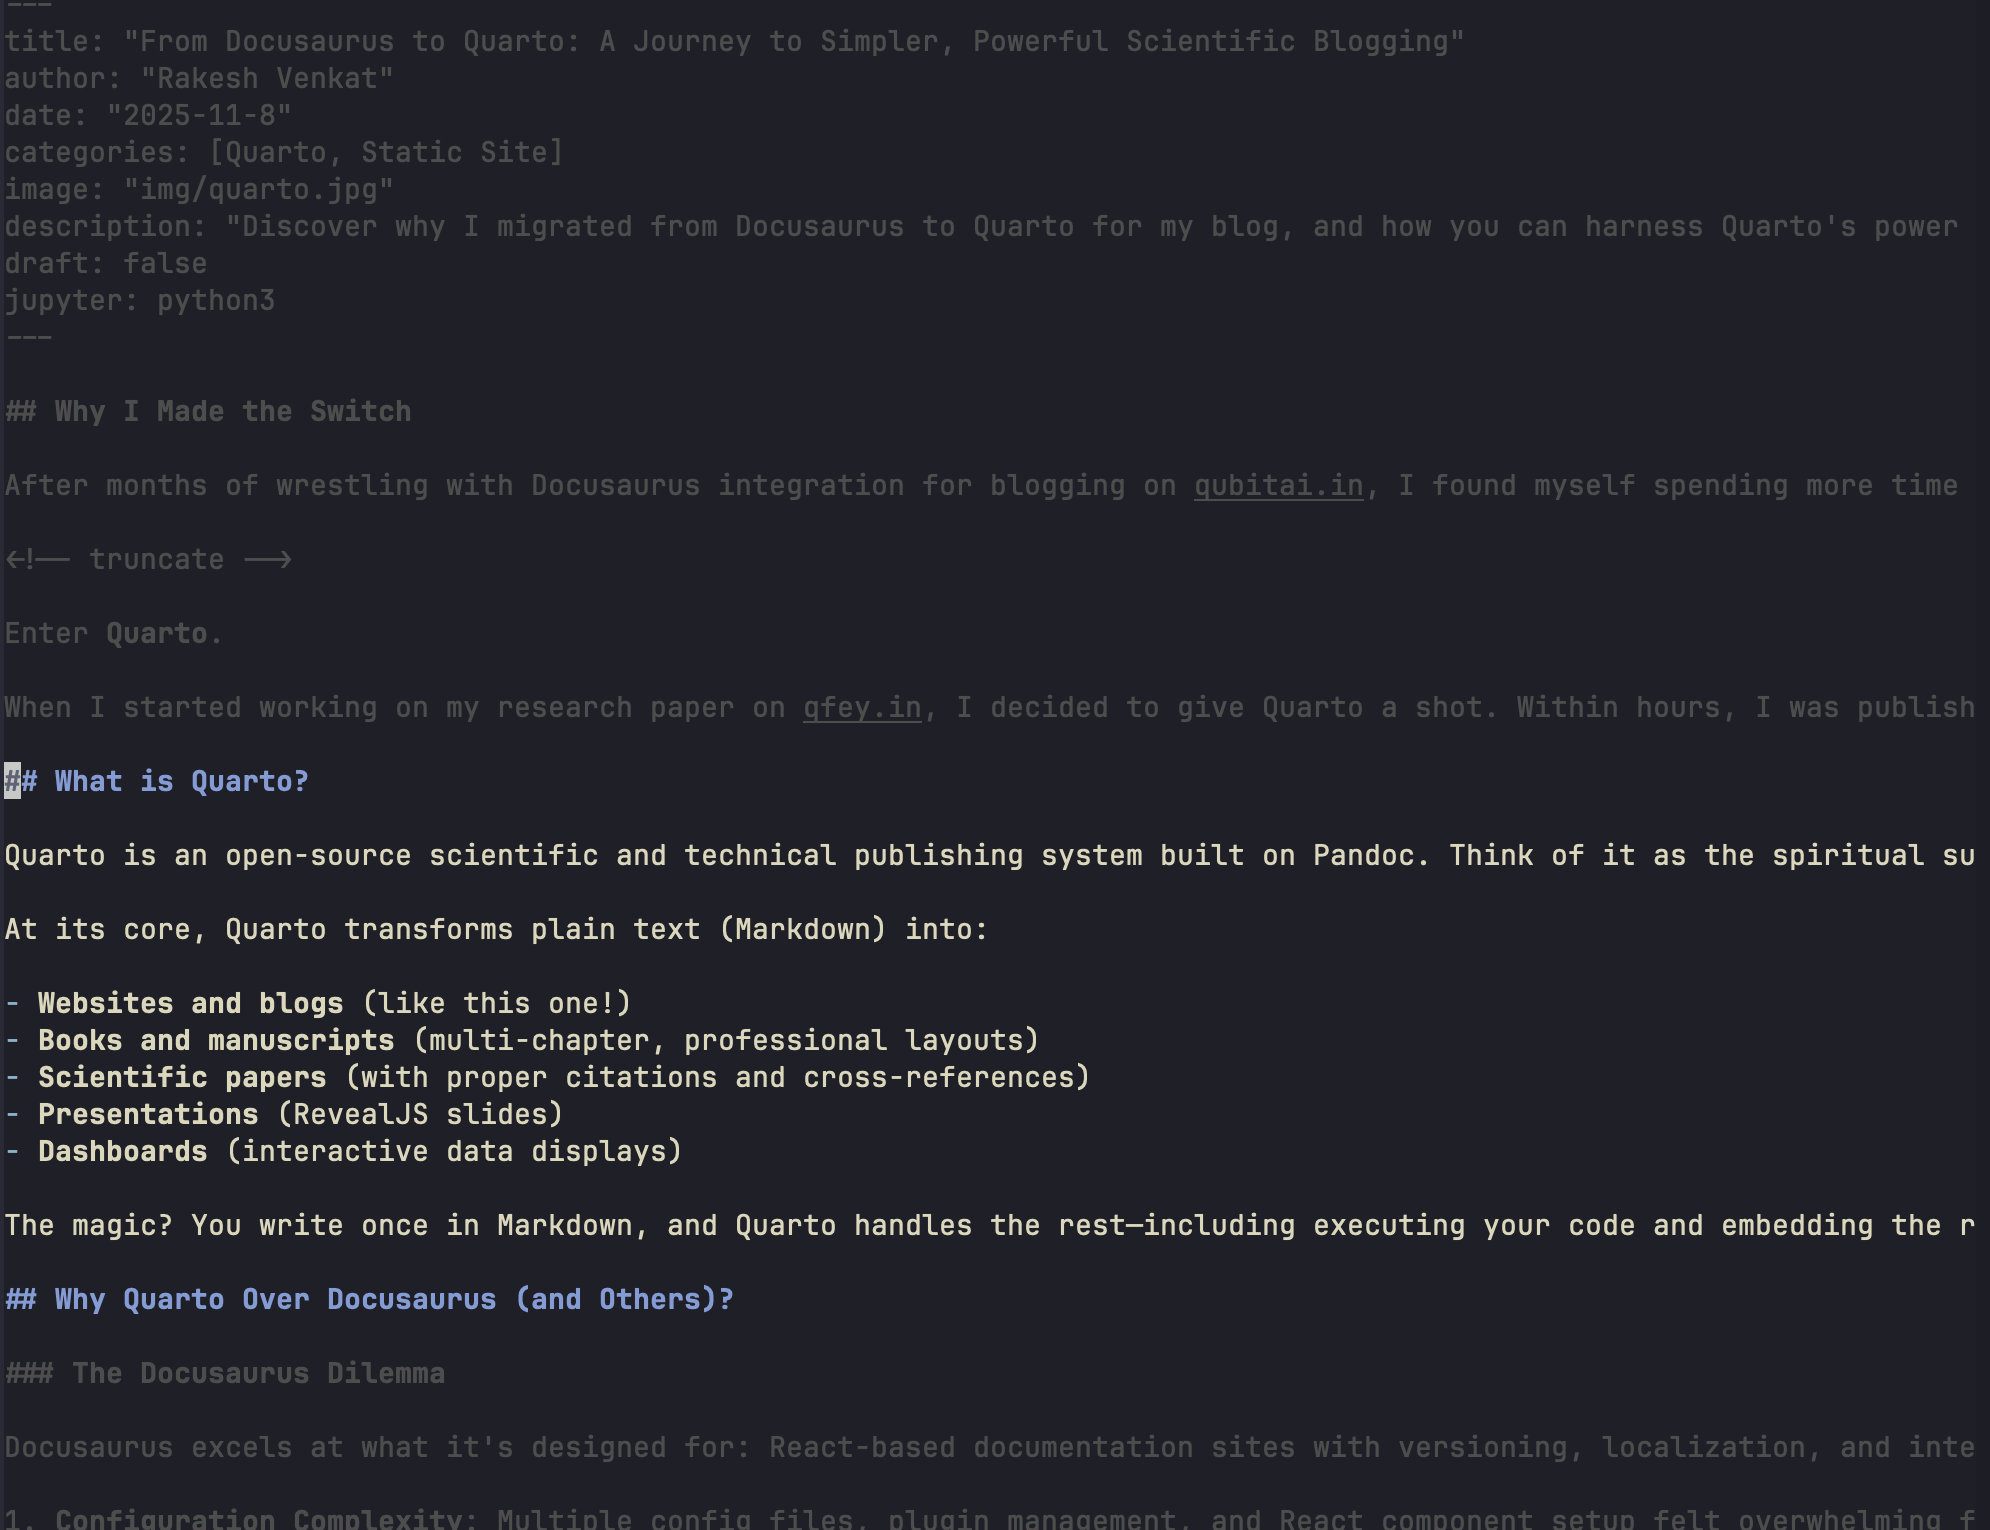
Why I Made the Switch

After months of wrestling with Docusaurus integration for blogging on qubitai.in, I found myself spending more time managing configurations than actually writing content. Don’t get me wrong—Docusaurus is a fantastic tool for documentation-heavy projects. But for a scientific blog with code outputs, mathematical equations, and research-oriented content? It felt like using a sledgehammer to crack a nut.

Enter Quarto.

When I started working on my research paper on qfey.in, I decided to give Quarto a shot. Within hours, I was trying out beautiful, reproducible content with embedded code execution, stunning visualizations, and zero configuration headaches. The difference was night and day.

What is Quarto?

Quarto is an open-source scientific and technical publishing system built on Pandoc. Think of it as the spiritual successor to R Markdown, but supercharged and language-agnostic. Whether you’re working with Python, R, Julia, or Observable JS, Quarto has you covered.

At its core, Quarto transforms plain text (Markdown) into:

  • Websites and blogs (like this one!)
  • Books and manuscripts (multi-chapter, professional layouts)
  • Scientific papers (with proper citations and cross-references)
  • Presentations (RevealJS slides)
  • Dashboards (interactive data displays)

The magic? You write once in Markdown, and Quarto handles the rest—including executing your code and embedding the results directly in your output.

Why Quarto Over Docusaurus (and Others)?

The Docusaurus Dilemma

Docusaurus excels at what it’s designed for: React-based documentation sites with versioning, localization, and interactive components. But here’s where it fell short for my needs:

  1. Configuration Complexity: Multiple config files, plugin management, and React component setup felt overwhelming for simple blog posts.
  2. Code Execution: No native support for running code and displaying outputs. You’re limited to syntax highlighting.
  3. Scientific Writing: LaTeX equations work, but integrating computational outputs requires workarounds.
  4. Build Overhead: Node modules, dependency management, and build times added friction to my writing workflow.

The Quarto Advantage

Simplicity: Write Markdown, add YAML headers, done. No build system to configure.

Computational Narratives: Execute Python, R, or Julia code and embed outputs—plots, tables, data—automatically.

Scientific Publishing: First-class support for citations, cross-references, equations, and academic formatting.

Multiple Outputs: One source file → HTML, PDF, Word, ePub. Need a website and a PDF report? Write once, render twice.

Performance: Lightning-fast rendering with incremental builds. No node_modules bloat.

What About MkDocs, Jekyll, or Hugo?

Let’s quickly compare:

  • MkDocs is excellent for documentation with Material theme, but lacks computational capabilities.

  • Jekyll and Hugo are fast static site generators, but require external tools for code execution (like Jupyter).

  • Docusaurus shines for developer documentation with versioning needs.

  • Quarto is purpose-built for scientific, data-driven, and computational content while still being simple for general blogging.

Getting Started with Quarto

Installation

First step is to install Quarto CLI from quarto.org.

# macOS
brew install quarto 

# Windows (using Chocolatey)
choco install quarto

# Linux
sudo wget https://github.com/quarto-dev/quarto-cli/releases/download/v1.4.550/quarto-1.4.550-linux-amd64.deb
sudo dpkg -i quarto-1.4.550-linux-amd64.deb

Second, choose the tool. I use RStudio but ,my preferred way is to use Quarto on Neovim via a plugin called quarto-nvim

RStudio

RStudio

My installation - Neovim

On Neovim, I use a plugin called “Zen mode” for focus mode. Read more about this plugn here

WithZen

Once you are ready, you can just run the following commands inside Neovim to activate and preview quarto document.

:QuartoActivate

:QuartoPreview
Neovim Setup

If you want to know more about neovim, checkout my setup

Why I use CLI for writing blogs This helps me to focus and write quickly and some other stuff will come here.

Creating Your First Blog

# Create a new blog project
quarto create project blog my-blog

cd my-blog

This generates a project structure:

my-blog/
├── _quarto.yml          # Site configuration
├── index.qmd            # Home page
├── about.qmd            # About page
├── posts/               # Blog posts directory
│   ├── _metadata.yml    # Posts metadata
│   └── post-1/
│       └── index.qmd    # Your first post
└── styles.css           # Custom styling

Configuration

Edit _quarto.yml:

project:
  type: website

website:
  title: "My Scientific Blog"
  description: "Exploring data, code, and ideas"
  navbar:
    left:
      - href: index.qmd
        text: Home
      - href: about.qmd
        text: About
      - href: posts.qmd
        text: Blog
    right:
      - icon: github
        href: https://github.com/yourusername
      - icon: twitter
        href: https://twitter.com/yourusername
  
  page-footer:
    center: "© 2025 Your Name. Made with Quarto."

format:
  html:
    theme: cosmo
    css: styles.css
    toc: true
    code-fold: false
    code-tools: true

Writing a Blog Post

Create posts/quarto-demo/index.qmd:

---
title: "Visualizing Data with Python"
author: "Your Name"
date: "2025-10-19"
categories: [python, data-viz, tutorial]
image: "thumbnail.png"
---

Introduction

Let’s explore data visualization with Python and matplotlib.

import matplotlib.pyplot as plt
import numpy as np

# Generate data
x = np.linspace(0, 10, 100)
y1 = np.sin(x)
y2 = np.cos(x)

# Create plot
plt.figure(figsize=(10, 6))
plt.plot(x, y1, label='sin(x)', linewidth=2)
plt.plot(x, y2, label='cos(x)', linewidth=2)
plt.xlabel('x')
plt.ylabel('y')
plt.title('Trigonometric Functions')
plt.legend()
plt.grid(True, alpha=0.3)
plt.show()

The beauty of Quarto? This code runs during rendering, and the plot appears in your blog automatically!

Preview

# Preview locally
quarto preview

# Render to HTML
quarto render

Advanced Features

1. Creating a Complete Website

Quarto isn’t just for blogs. Here’s a complete website structure:

# _quarto.yml
project:
  type: website
  output-dir: _site

website:
  title: "QubitAI"
  navbar:
    left:
      - text: "Home"
        href: index.qmd
      - text: "Blog"
        href: blog.qmd
      - text: "Projects"
        href: projects.qmd
      - text: "Research"
        menu:
          - text: "Papers"
            href: research/papers.qmd
          - text: "Talks"
            href: research/talks.qmd
      - text: "About"
        href: about.qmd

2. Writing Books

quarto create project book my-book

Books get automatic chapter navigation, cross-references, and can output to PDF, ePub, or HTML:

book:
  title: "Quantum Computing Fundamentals"
  author: "Your Name"
  chapters:
    - index.qmd
    - intro.qmd
    - quantum-basics.qmd
    - algorithms.qmd
    - references.qmd

3. Python Integration (Real Example)

Let me show you a practical example with data analysis:

import matplotlib.pyplot as plt
import numpy as np
from scipy import stats

# Generate sample data
np.random.seed(42)
normal_data = np.random.normal(100, 15, 1000)
exponential_data = np.random.exponential(2, 1000)

# Create subplots
fig, axes = plt.subplots(1, 2, figsize=(14, 5))

# Normal distribution
axes[0].hist(normal_data, bins=30, density=True, alpha=0.7, color='skyblue', edgecolor='black')
axes[0].set_title('Normal Distribution', fontsize=14, fontweight='bold')
axes[0].set_xlabel('Value')
axes[0].set_ylabel('Density')
axes[0].grid(True, alpha=0.3)

# Add theoretical curve
x_range = np.linspace(normal_data.min(), normal_data.max(), 100)
axes[0].plot(x_range, stats.norm.pdf(x_range, 100, 15), 'r-', linewidth=2, label='Theoretical')
axes[0].legend()

# Exponential distribution
axes[1].hist(exponential_data, bins=30, density=True, alpha=0.7, color='lightcoral', edgecolor='black')
axes[1].set_title('Exponential Distribution', fontsize=14, fontweight='bold')
axes[1].set_xlabel('Value')
axes[1].set_ylabel('Density')
axes[1].grid(True, alpha=0.3)

# Add theoretical curve
x_range_exp = np.linspace(0, exponential_data.max(), 100)
axes[1].plot(x_range_exp, stats.expon.pdf(x_range_exp, scale=2), 'r-', linewidth=2, label='Theoretical')
axes[1].legend()

plt.tight_layout()
plt.show()

print(f"Normal: mean={normal_data.mean():.2f}, std={normal_data.std():.2f}")
print(f"Exponential: mean={exponential_data.mean():.2f}, std={exponential_data.std():.2f}")
Figure 1: Distribution of Random Variables
Normal: mean=100.29, std=14.68
Exponential: mean=2.02, std=2.00

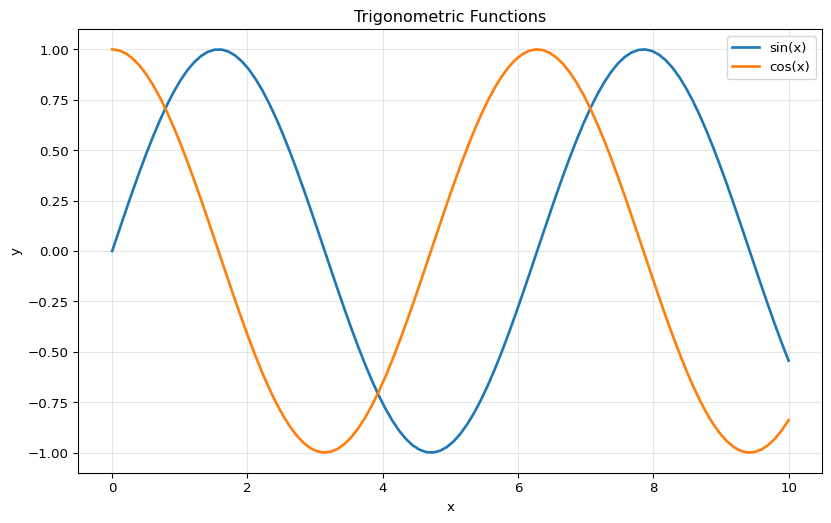
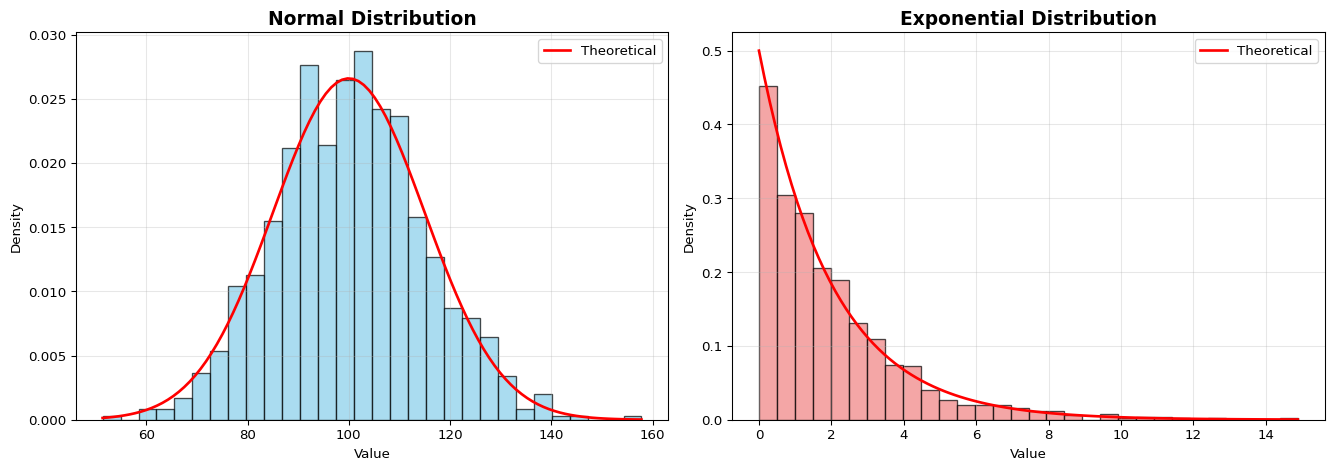
The plot and printed statistics will appear directly in your rendered blog. No manual screenshots needed!

4. Cross-References and Citations

See @fig-analysis for the distribution comparison.

According to @smith2023quantum, quantum computing will revolutionize cryptography.

## References

::: {#refs}
:::

Add a references.bib file:

@article{smith2023quantum,
  title={Quantum Computing Applications},
  author={Smith, John},
  journal={Nature},
  year={2023}
}

5. Interactive Elements

Quarto supports Observable JS for interactivity:

data = Array.from({length: 100}, (_, i) => ({
  x: Math.random() * 100,
  y: Math.random() * 100,
  value: Math.random() * 100,
  category: ["Quantum", "AI", "Data Science"][Math.floor(Math.random() * 3)]
}))

viewof threshold = Inputs.range([0, 100], {
  value: 50, 
  step: 1, 
  label: "Filter by value threshold:"
})

filtered_data = data.filter(d => d.value > threshold)

Plot.plot({
  marks: [
    Plot.dot(filtered_data, {
      x: "x", 
      y: "y", 
      fill: "category",
      r: 5,
      opacity: 0.7
    })
  ],
  color: {legend: true},
  grid: true,
  width: 700,
  height: 500,
  marginLeft: 50
})

Integrating Quarto with Existing Websites

This is where Quarto really shines for real-world scenarios.

Scenario 1: Quarto Blog + Existing HTML Site

If you have an existing HTML/React/Vue site and want to add a Quarto blog:

# _quarto.yml
project:
  type: website
  output-dir: ../existing-site/blog  # Output to your site's blog folder

website:
  site-url: "https://qubitai.in"
  bread-crumbs: false
  navbar:
    left:
      - text: "← Back to Main Site"
        href: "https://qubitai.in"

Your existing site can link to /blog/ and Quarto handles everything there.

Scenario 2: Embedding Quarto Output

Render Quarto to standalone HTML:

format:
  html:
    embed-resources: true
    standalone: true

Then embed in your existing site:

<iframe src="/quarto-content/article.html" 
        width="100%" 
        height="800px" 
        frameborder="0">
</iframe>

Scenario 3: Custom Theme Integration

Match Quarto styling to your existing site:

format:
  html:
    theme: none  # Disable default theme
    css: 
      - ../main-site/styles.css
      - custom-quarto.css
    include-in-header:
      - ../main-site/header.html
    include-after-body:
      - ../main-site/footer.html

My Migration Journey: Docusaurus → Quarto

What Changed (for the Better)

Before (Docusaurus): - 10+ configuration files - node_modules: ~500MB - Build time: 45 seconds - Markdown + MDX components - Separate code blocks (no execution)

After (Quarto): - 1 primary config file (_quarto.yml) - No dependencies folder - Build time: 3 seconds - Pure Markdown + YAML - Live code execution

Manual Migration

  1. Set up Quarto project:

    quarto create project blog qscribe
  2. Convert posts: Migrated Docusaurus MDX to Quarto QMD

    • Changed frontmatter format
    • Added executable code blocks where relevant

Automated Migration - Better Approach

I have created a cli script Doc2Quarto to help you with this migration. This is an open source tool. Instructions are available here.

Doc2Quarto

here’s how it looks

$> doc2quarto --help
Converts markdown.md to Quarto .qmd format

Usage: doc2quarto --source <SOURCE> --dest <DEST>

Options:
  -s, --source <SOURCE>  source directory containing Docusaurus markdown files
  -d, --dest <DEST>      destination directory for converted Quarto files
  -h, --help             Print help

CLIPreview

Doc2Quarto Installation

Option 1: Install from crates.io (Rust Users)

# requires rust
$> cargo install doc2quarto

Option 2: Using homebrew on MacOS

$> brew install rvbug/tap/doc2quarto

Option 3: Debian (Linux)

Download the .deb package from releases:

# Download latest release 
$> wget https://github.com/rvbug/doc2quarto/releases/download/v0.1.1/doc2quarto_0.1.1-1_amd64.deb

# Install
$> sudo dpkg -i doc2quarto_0.1.1-1_amd64.deb

For more information please checkout my Github Repo

Tips for Success

  1. Start small: Convert one blog post first. Test the workflow.

  2. Use VSCode: If you are VSCOde, just install the Quarto extension for syntax highlighting, preview, and rendering shortcuts.

  3. Leverage freeze: For expensive computations:

    execute:
      freeze: auto  # Only re-run when code changes
  4. Version control: Commit source .qmd files, not rendered _site/ directory.

  5. CI/CD: Use GitHub Actions for automatic deployment:

    name: Publish
    on:
      push:
        branches: main
    jobs:
      build-deploy:
        runs-on: ubuntu-latest
        steps:
          - uses: actions/checkout@v2
          - uses: quarto-dev/quarto-actions/setup@v2
          - run: quarto publish gh-pages

Real-World Use Cases

  • Academic Research: Publish reproducible papers with embedded analysis

  • Data Science Portfolios: Showcase projects with live code and visualizations

  • Technical Documentation: Books, tutorials, and API references

  • Company Blogs: Technical content with code examples (engineering blogs)

  • Course Materials: Interactive lessons with executable examples

Conclusion

Switching from Docusaurus to Quarto was one of the best decisions for my technical blog. The simplicity, power, and focus on scientific publishing transformed my workflow. I spend less time fighting with configurations and more time creating content.

If you’re running a technical blog, working with data, or publishing research, Quarto deserves serious consideration. It’s not just a tool—it’s a complete publishing system that respects your time and amplifies your content.

Try it yourself:

  1. Install Quarto: brew install quarto (or download from quarto.org).
  2. Create a project: quarto create project blog my-blog.
  3. Write your first post.
  4. Preview: quarto preview.

Four commands. Zero configuration overhead. Beautiful, reproducible output.

Welcome to the future of scientific publishing.


Resources:

Have questions about Quarto or migration? Feel free to reach out!